A workshop doesn’t look like an actual workshop without at least one small or big workbench within the space, does it?
Whether you are a novice or a professional, you will require a solid surface to carry out your work. Even if you are planning to begin your woodworking business, your priority will be to have a workbench to work from. Otherwise, your workspace will turn out to be a mess.
Now:
You can now decide to head out to buy a pre-built workbench from a nearby shop and start working with it. However, remember that the pre-made workbench can cost you a pretty fortune. Additionally, you may not find a worktable design that appeals to you or perfectly fulfills your needs. You may have to add a few more bucks to get one near to your choices.
The entire process can be vexing.
So is there any alternative solution?
Yes, the best thing you can do is to make your own workshop bench. And if you are a woodworker, it’s a glorious choice for you.
It’s worth looking into amazing free workbench plans, building a work table yourself, choosing a suitable height, materials, and shelves, and kickstart your new journey.
Building DIY workbenches isn’t too hard if you follow proper instructions and procedures. Keep on reading!
5 Best Free Workbench Plans and Designs for You
Interestingly, if you can assimilate the process of building workbenches, you get away to improve yourself as an amateur DIYer. Here we have compiled five of the best DIY workbench plans that will leave you with a durable and sturdy piece of furniture that can boost your pleasure and productivity in the workshop.
Buck up; you have got enough work to do this week!
1. Simple Discreet Workbench
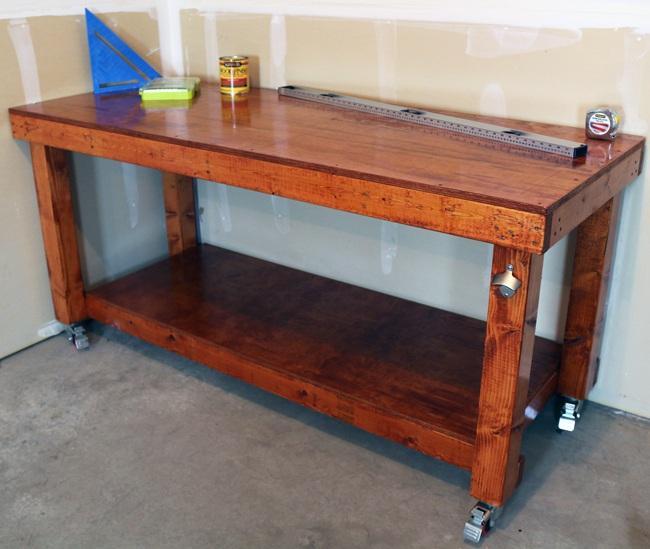
This free-standing workbench can be an amazing addition to your garage or shed. It boasts a simple design but is sturdy and functional. Moreover, you will get ample space to carry out your work.
However, the best thing about this DIY tool is that the process of building it is extremely easy. For novices who are looking to try on their woodworking skills can start their journey by building this bench. It is affordable to build.
You can even use the workbench as your secondary work surface. And store your work materials or so on both the shelf and benchtop.
Take a look at the workbench plan –
Tools That You Need
- Drill
- Miter Saw or Circular Saw
- Impact driver
- Tape Measure
- Pencil and Straight edge
- Eye and ear protection
- Orbital Sander.
Supplies/Materials That You Need
- Lumber – (2 x4) and (4 x 4)
- Plywood sheets – (4 x 8)
- Minwax Gunstock Stain
- Minwax Polyurethane
- Sandpaper
- Wood screws
- Caster wheels – 4 inches
- Washers
Total Approximate Cost
You can build this simple yet sturdy DIY workbench for nearly $175. However, the cost can be even reduced right away by utilizing one plywood sheet.
The Steps
Step 1: Cut off the Wood Pieces
To begin, mark and cut all the different pieces of wood or other materials by using a circular saw. However, you can even use a table saw, or miter saw for it.
After you completed the cuts, take the boards and carry out a quick sanding, and then, assemble them.
Step 2: Start to Create the Top
Now that you have cut all the pieces, it’s time to assemble your DIY workbench.
- Hold the legs along with the top stretcher supports and the top lengthwise supports.
- Place one of the top stretcher supports to the center, followed by another, maintaining about 18 inches gap.
- Fasten all these pieces together using 2 ½ inches of wood screws.
Note: You have to pre-drill holes before fastening the wood screws and assembling them all.
Step 3: Set up the Bottom Part
Just like the top section, you will fabricate the bottom portion following a very similar construction process.
You will see that the bottom lengthwise board that will be facing you is connected inside the legs. Eventually, you get more space to work on the bench.
- Nevertheless, attach all these with screws, just like before.
- Secure the caster wheels now
- Add a washer on the screws’ top. It will ensure a strong grip.
Step 4: Attach the Plywood After Cutting
- Now, you will have to take the plywood pieces top and bottom and cut them to size.
- Pre-drill the holes and attach these pieces using wood screws of 1 ¼ inch
- Use the number of screws generously according to needs.
Step 5: Stain the Workbench
For staining, use the Minwax’s Gunstock Stain to build this workbench. However, you have to first test the color on a small piece of wood and then apply it to the entire thing.
Remember to stain the entire surface of the wood, including all corners and nooks, and underneath the workbench. You have to allow the stain to dry. After that, apply a transparent coat of lacquer or polyurethane to the DIY workbench.
That’s it! Here you are, with a solid, robust workbench in front to start your work.
Read More: Top 5 Power Tools You Need to Buy for Your Woodshop?
2. A Robust Garage Workbench
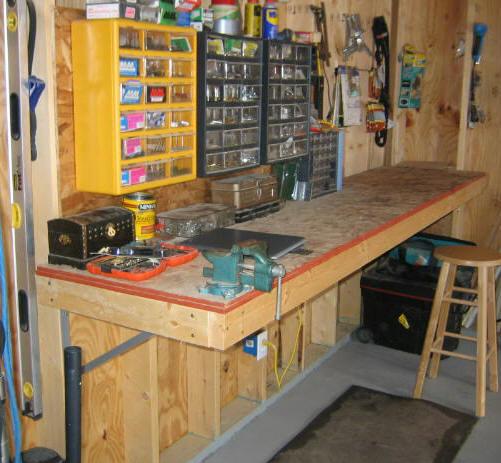
Do you have a garage? If yes, you can try this DIY workbench. It will serve as a perfect, solid surface to work on, leaving your tools.
And we always acknowledge the fact that it is very easy to assemble and build. Furthermore, you will need only a few tools to make this garage workbench. Interestingly, while it will have no legs, you will have enough space to store. In addition, you can easily clean it down.
Tools That You Need
- Drill
- Circular Saw
- Tape Measure
- A few clamps
- Pencil and Straight edge
- Nuts & nails
- Bolt
- Eye and ear protection.
Supplies/Materials That You Need
- 1 Particleboard – ½ inch size @ 4 x 10
- 5 Support bracing – 2 x 4 x 10 inches
- 4 Metal angled brackets – 13” x 19”
- 24 Lag bolts – 5/16 inches x 3 inches; it’s for angled supports
- 16 Spikes – ½ pound
- 10 Penny nails – ½ pound
- 1 wood screw – ¼ inches.
Total Approximate Cost
It would cost you less than $100 to build.
The Steps:
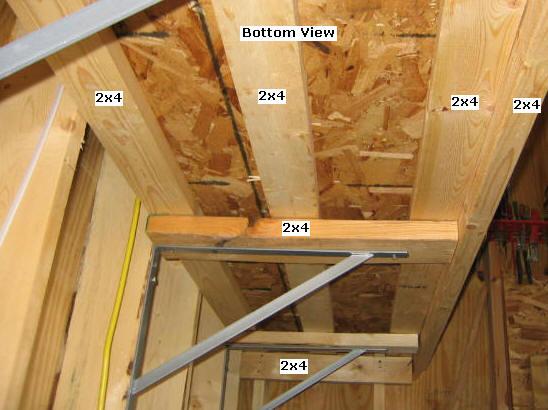
Step 1: Fastening the Metal Brackets to the Wall
First, you need to establish the working surface’s height. So how to do this?
- Just estimate the distance from the ceiling
- Now add four inches to it
- Mark that point and split a level line to get the length of the required bench
Keep note that this snapped line is your guide. Based on it, you have to place the durable metal brackets maintaining 32 inches on the studs. Then, take the 5/16 inches to lag bolts and attach them.
Step 2: Connect the Support Pieces
- Choose one 2 x 4 x 10’ and a 24 inches piece of scrap
- Alternatively, you can employ two pieces @ 2 x 4 x6 or a 2 x 4 x 12
- Rip pieces for the support pieces @ 22 ½ inches.
Now:
At first, you have to place one support flatly and then, the top of all the four metal brackets. Eventually, the block’s backside will touch the stud or wall. Now, utilizing the wood screws from the bottom, you have to fasten the support blocks to the brackets.
Step 3: Connect the Support Pieces of Secondary Base
- Pick up three 2 x 4 x10’
- Rip off three pieces for the pieces of Base Support @ 109 inches
Now:
- Place one piece next to the wall edge, another to the front edge, and the third one in the center.
- You have to now join these three to the short supports sitting perpendicularly using the nails.
- And the other two short supports have to be attached to the right and left sides.
Step 4: Assembling the Front Piece and the Top Surface
Now you have the remaining 2 x 4 that you need to rip to 110 ½ inches and then join it to the Support pieces’ front edge.
Take the particleboard, measuring ½” x 4’ x 10’
Cut across it to 110 ½ inches, and you will get two half pieces of 24 inches.
Now hold the two pieces and pile them on top of one another
Lastly, attach them to support pieces with screws.
Step 5: Your Bench is Complete
This DIY workbench is virtually complete. Set a back panel on the top of the bench, dangle your components, and it’s ready to use.
Also Read: Best Benchtop Planers
3. The Shanty 2 Chick DIY Workbench
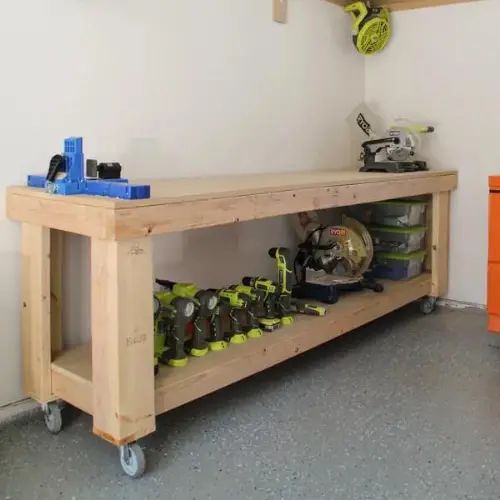
Are you excited to build a workbench for your workplace? Are you thinking about whether there is any DIY workbench plan for a small space?
Well, check out this Shanty 2 chick workbench, especially built for small workplaces. What’s more exciting is that it’s affordable too.
Again, you won’t have to put in much effort to make this work table. It boasts a basic design, pairing two pairs of wheels to move it effortlessly all around your room. And with great materials, you can always expect better quality, and life becomes easier.
So let’s get started!
Tools That You Need
- Drill
- Miter Saw or Circular Saw
- Tape Measure
- Pencil and Straight edge
- Eye and ear protection
Supplies/Materials That You Need
- 2 x 6 x 8 – 2
- 2 x 4 x 8 – 7
- Sheets of ¾” MDF – 24 x 8
- 45” locking rubber casters
- 2.5” wood screws
- Kreg jig.
Total Approximate Cost
The total cost of building this workbench is about $155.
The Steps
Step 1: Rip MDF Boards and make Cuts
Begin the process by ripping down the MDF boards and making cuts. You can use your Kreg Jig to drill pocket holes in the legs.
Step 2: Join the Frames
Now it’s time to take the frames out. Two frames should be of different sizes. However, you will have to join the frame to the legs.
Next, attach the footpads.
Step 3: Set the Bottom Frame
Take wood screws of 2 ½ inches to fasten the bottom frame into the legs. However, make sure to insert them from the frame inside. Now you need to attach your casters before it becomes heftier.
Keep note that you buy locking casters for it.
Step 4: Fix the Bottom Shelf An Top
You can use wood glue and brad nailer for setting the bottom shelf. Then, follow a similar procedure to fix the top.
That’s it! You will love your new DIY workbench.
You May Also Read: How to Use Table Saw | Different Types of Wood Cutting Techniques
4. Simple Popular Mechanics DIY Workbench
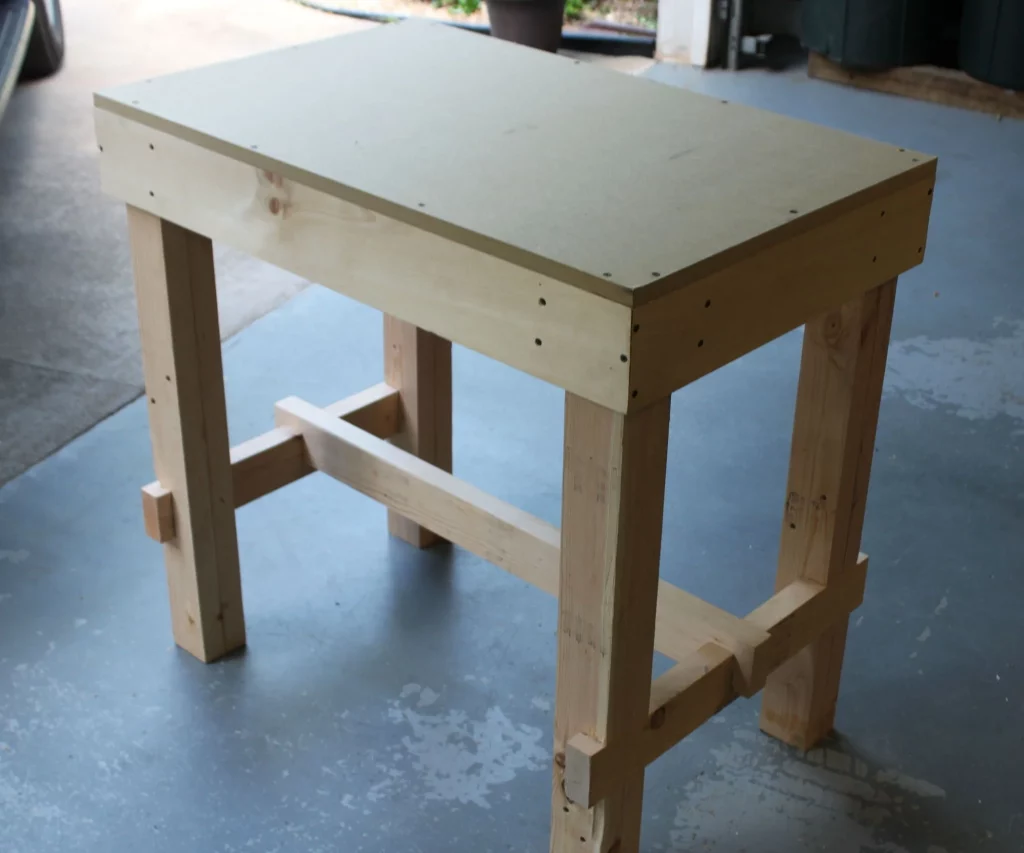
Get ready to make a traditional, sturdy workbench for your new workshop. The popular mechanic’s plan includes the required tools and materials along with detailed instructions.
The bench is made up of usual construction lumber, dowels, lag screws, and threaded rods. The result is a robust and promising companion to support you for long years. Take a look!
Tools That You Need
- Wood – Construction-grade lumber.
However, try to select dry, straight pieces with the least defects or knots.
- Handsaw
- Circular saw
- Hacksaw
- Driver/drill
- Block plane
- Tape measure
- Doweling jig
- Square
- 9/16 inches wrench
- Twist bits
- 1-inch multi spur bit or spade.
Supplies/Materials That You Need
- Threaded rod – 3/8 inches
- Lagscrews – 3/8 x 4 inches, 3/8 x 6 ½ inches, 3/8 x 4 ½ inches
- Washers – 3/8 inches
- Woodscrew – 3 inches, No. 10 fh
- Glue.
Total Approximate Cost
You can build this simple yet sturdy table for less than $150 in just a few hours.
The Steps
Step 1
The rails and bench legs are built of 2 x 4s. On the other hand, the stretchers measuring 2 x 6 increase the rigidity of the frame.
Don’t have a radial arm or power miter saw? Then, use a circular saw in conjunction with a Speed Square or any other rafter-angle square to cut across the material to the finished size. Now, rip off the oversize top strips.
DIY workbenches allow you to choose your space and match your bench height as per your wish. If you want to build a long bench or a stout top, use 1 x 3 stock instead of 1 x 2s.
Step 2
If you drive lag screws into softwood, it might not hold them well. In that case, use glue 1-inch rivets in the passage of the lag screw threads. When cutting the dowels with a handsaw, keep it pretty oversized.
You can bore the holes in dowels using a spade bit. However, a multi spur bit can get you a cleaner one.
Start boring holes of 3/8 inches in the interconnecting pieces that allow threads to pass through easily. Next, drill pilot holes of 3/16 inches for lag screw threads.
Step 3
Now that you have ripped off the top strips uniformly oversize, drill holes of about 3/8 inches for the threaded rods.
The rods need to be cut a bit longer. Then you have to insert a nut and washer at one end of each, followed by boarding every strip within the rods. After you assemble everything in one place, start adding the remaining nuts and washers.
Complete the step by tightening and trimming the ends of the benchtop.
Step 4
You installed the vise that needs a 2 inches spacer. You can create it from three layers of wood. However, a top-mounted vise could also solve the purpose.
5. Sturdy Workbench
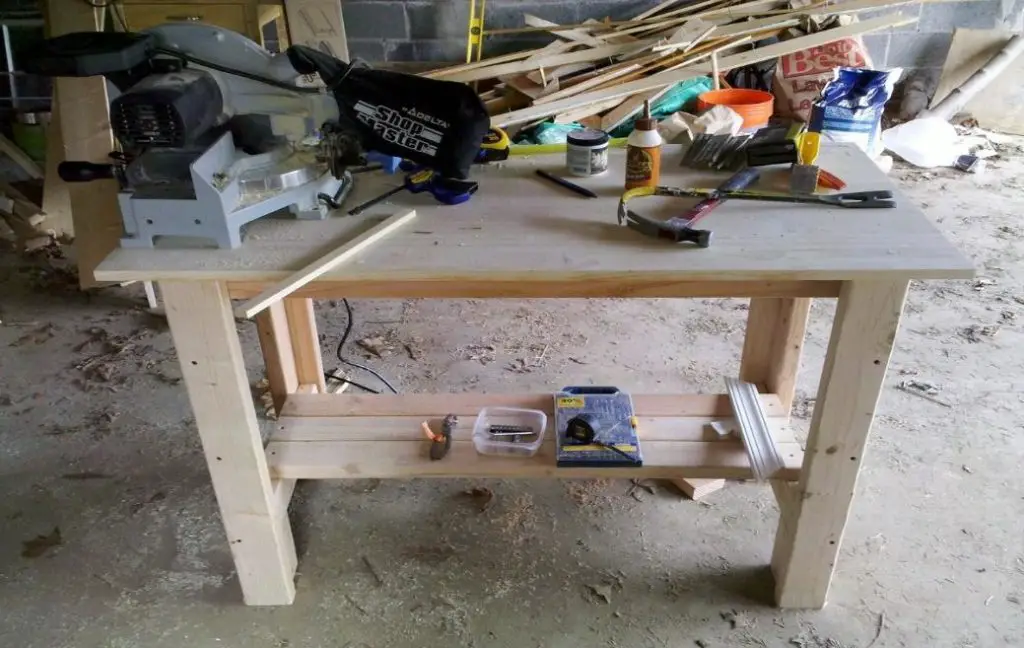
This Ana White’s Sturdy Workbench can give you a lot of bang for your buck. It looks peasant and, indeed, cool. Let’s talk about the details.
Tools That You Need
- 120 grit sandpaper
- 2 ½” screws
- Wood conditioner
- Paintbrush
- Measuring tape
- Screwdriver
- A framing pencil
- Nails & screws.
Supplies/Materials That You Need
- 24” x 48” x 1” – 1 laminated pine board
- 2” x 4” x 8” – 9
Cutting List
- 2 x 4 @ 12 – 4
- 2 x 4 @ 40 – 4
- 2 x 4 @16 – 2
- 2 x 4 @ 3” – 4
- 2 x 4 @ 33” – 8.
Note: All the cuts mentioned here employ 2 x 4s true measurement and are done by a circular saw. Moreover, this cutting list will also be applicable for 2 x 4s, measuring 1.75” x 3.75”.
Total Approximate Cost
It will cost you less than $50 to make this sturdy DIY workbench.
The Steps
Step 1
At first, rip two 2 x 4s lengthwise
Join them together, keeping at a 90-degree angle
Step 2
Follow it one after another: Lather, rinse and repeat.
Here three more legs will be required to create the DIY workbench.
Step 3
Now, take a 2 x 4 and cut it into four parts. Each portion will be three inches. Take two construction fasteners and attach them securely to the legs’ bottom.
Step 4
You will now attach the shelf supports. Remember that you can remember your project’s width based on your shelf’s length. Thus, before adding the shelf supports, decide the length you want.
For example, you may want to have a tabletop of 24” x 48” and a 2-inch overhang in the back and front. Subtract 4-inch for the legs. So you need to split each of the shelf support up to 16-inch.
Step 5
Now, follow the same length of your shelves and cut the stretchers accordingly. After that, attach them to the legs’ top.
Step 7
Next, you need to affix supports for completing the top surface. Keep note that the shelf supports will be nearly four inches taller than the shelf supports. So, in this case, each will be 12 inches.
However, the number of supports you need will depend on the material you employ. Now, place the supports evenly, securing with two screws.
Step 8
You can add a laminated 1x2s pine to create a 24”x48” top. They are available at cost-effective prices, and it gets reasonably hard after varnishing. However, you can even make a top on your own in different ways.
In addition, you can also consider piling three pieces of plywood of the same size on top of one another.
Bonus Read: Best Gas Chainsaws – Top Picks & Reviews
Conclusion
So here you have the 5 excellent DIY workbench plans and designs. Whether you are looking for a bench to store or something edgier to fit in small to big spaces, the above-mentioned free workbench plans will help you build something, customizing it according to your needs.
